目錄
更新於 2025 年 11 月
簡介
什麼是 Addrly?
Addrly 是一款現代化、跨平台的桌面應用程式,專為高效的批次地址標籤列印而設計。它提供以離線為主的解決方案,具備智慧地址解析、批次處理功能,並支援多種印表機通訊協定。
主要功能
智慧地址解析
自動識別並解析北美地址格式
豐富文字編輯器
具備格式控制的所見即所得標籤編輯
多通訊協定支援
TSPL、ZPL、EPL、CPCL 和 Windows 列印
地址管理
儲存、搜尋和管理您的地址資料庫
列印歷史
追蹤您所有的列印活動
多語言介面
支援 11 種語言
離線操作
所有資料儲存在本機,無需網際網路
批次列印
透過簡化的工作流程高效列印多個標籤
QuickBooks 整合
可選的 QuickBooks Online 整合
系統需求
Windows
Windows 10 或更高版本,最低 4GB RAM,200MB 可用磁碟空間
macOS
macOS 10.15 或更高版本(Intel 或 Apple Silicon),最低 4GB RAM,200MB 可用磁碟空間
Linux
Ubuntu 18.04+、CentOS 7+ 或 Fedora 30+,最低 4GB RAM,200MB 可用磁碟空間
快速開始
安裝
從官方網站或發行管道下載適用於您作業系統的安裝套件。
執行安裝程式並按照螢幕上的指示操作。
從桌面或開始功能表啟動 Addrly。
首次啟動
當您首次啟動 Addrly 時,您會看到啟動畫面,接著是主介面。應用程式將自動偵測您系統上可用的印表機。
專業提示
在列印您的第一個標籤之前,我們建議在「設定」中配置您的預設寄件人地址。這將使建立回郵地址標籤更容易。
3. 主要功能概覽
應用程式結構
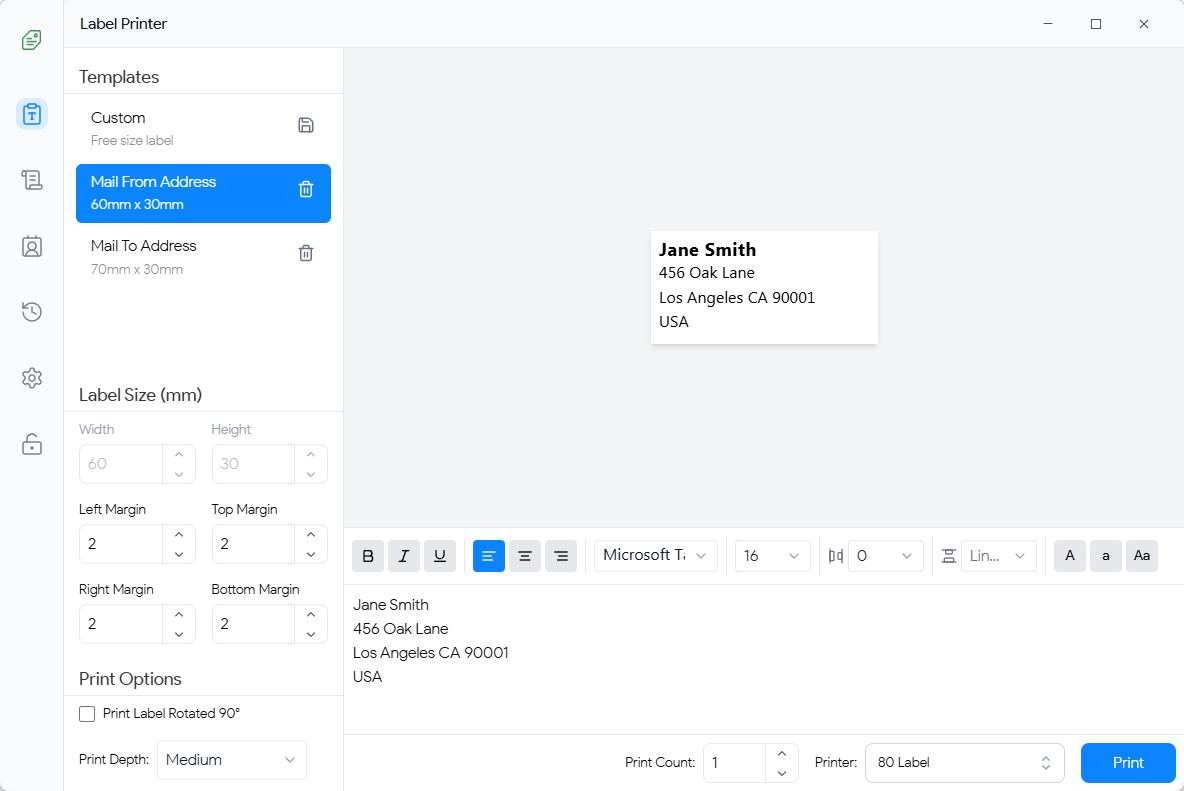
圖 1:Addrly 主介面
應用程式包含五個主要部分,可從側邊欄存取:
- • 首頁: 建立並列印標籤
- • 地址管理器: 管理您的地址資料庫
- • 列印歷史: 檢視過去的列印活動
- • 設定: 配置應用程式偏好設定
導覽
使用左側的圖示側邊欄在不同部分之間導覽。點擊任何圖示即可切換到該部分。目前所在的部分將會被標示。
4. 首頁 - 建立標籤
概覽
首頁是您建立、編輯、預覽和列印地址標籤的地方。它採用分割窗格佈局,左側為地址輸入,右側為標籤預覽。
逐步教學:建立您的第一個標籤
4.1 輸入地址資訊
1. 在地址輸入區域,您可以:
- 直接輸入地址
- 從剪貼簿貼上地址
- 點擊「解析」以自動將地址解析為結構化欄位
2. 地址編輯器允許您編輯地址的每一行。您可以:
- 新增或移除行
- 格式化文字(粗體、斜體、底線)
- 調整對齊方式(靠左、置中、靠右)
- 更改字型系列和大小
- 調整字元間距和行高
4.2 格式化您的標籤
格式化工具列提供以下選項:
- 粗體 (B): 將選取的文字設為粗體
- 斜體 (I): 將選取的文字設為斜體
- 底線 (U): 為選取的文字加上底線
- 對齊: 靠左、置中或靠右對齊文字
- 字型系列: 從系統字型或內建字型中選擇
- 字型大小: 調整文字大小(8-72 點)
- 字元間距: 控制字元之間的間距
- 行高: 調整行之間的間距
- 文字轉換: 正常、大寫、小寫或首字母大寫
- 文字顏色: 使用色彩選擇器選擇文字顏色
4.3 選擇範本
Addrly 附帶多個預先配置的標籤範本:
- 小型標籤: 50mm × 25mm
- 中型標籤: 70mm × 30mm
- 大型標籤: 100mm × 50mm
- 自訂: 定義您自己的尺寸
從範本下拉選單中選擇一個範本,或選擇「自訂」以毫米為單位設定您自己的寬度和高度。
4.4 標籤尺寸設定
在標籤尺寸部分,您可以配置:
- 寬度 (mm): 標籤寬度(毫米)
- 高度 (mm): 標籤高度(毫米)
- 左邊界 (mm): 從左邊緣的水平偏移
- 上邊界 (mm): 從上邊緣的垂直偏移
- 列印份數: 要列印的份數
- 旋轉 90°: 將標籤旋轉 90 度列印
- 列印深度: 低、中或高(影響列印品質)
4.5 預覽
右側的預覽窗格顯示標籤列印時的即時預覽。當您更改地址或格式時,預覽會自動更新。
注意: 如果文字超出標籤尺寸,您會看到警告。您可以選擇繼續列印或調整文字大小以適應。
4.6 列印
1. 從「印表機」下拉選單中選擇一台印表機。如果未配置印表機,請點擊「前往設定」以新增一台。
2. 在預覽窗格中檢視您的標籤。
3. 點擊「列印」按鈕開始列印。
4. 列印開始時將出現成功訊息。
4.7 儲存地址
建立標籤後,您可以儲存地址以供將來使用:
1. 點擊「儲存地址」按鈕
2. 輸入此地址的名稱(例如,「王小明 - 住家」)
3. 點擊「儲存」將地址儲存到您的地址資料庫中
5. 地址管理器
概覽
地址管理器允許您儲存、搜尋、編輯和管理所有已儲存的地址。如果您經常為相同的收件人列印標籤,這特別有用。
檢視地址
地址管理器以清單顯示所有已儲存的地址。每個地址顯示收件人的姓名和基本資訊。點擊任何地址以在右側窗格中檢視其完整詳細資訊。
搜尋地址
使用頂部的搜尋方塊按姓名、公司、城市或任何其他欄位快速尋找地址。清單會隨著您輸入即時篩選。
新增地址

圖 2:新增地址
1. 點擊「新增地址」按鈕(加號圖示)
2. 填寫以下地址欄位:
- 姓名: 收件人全名(必填)
- 公司名稱: 公司或組織(選填)
- 街道: 街道地址(必填)
- 單位號碼: 公寓、套房或單位號碼(選填)
- 城市: 城市名稱(必填)
- 州/省: 州或省(必填)
- 郵遞區號: 郵遞區號(必填)
- 國家: 國家名稱(必填)
3. 點擊「儲存」以新增地址,或「儲存並新增」以儲存並立即開始新增另一個地址。
從文字解析地址
您可以透過貼上地址文字快速新增地址:
1. 點擊「從剪貼簿貼上」或點擊「解析地址」按鈕
2. 在對話框中貼上或輸入地址文字
3. 點擊「解析」 - 地址將自動解析到表單欄位中
4. 如果需要,檢視並編輯解析的欄位,然後儲存
編輯地址
1. 點擊您要修改的地址旁邊的編輯圖示(鉛筆)
2. 在表單中進行更改
3. 點擊「儲存」以更新地址
刪除地址
1. 點擊地址旁邊的刪除圖示(垃圾桶)
2. 在對話框中確認刪除
從 QuickBooks 匯入
如果您已連接 QuickBooks Online,您可以直接匯入客戶地址:
1. 點擊地址管理器工具列中的「QuickBooks」按鈕
2. 您將被帶到 QuickBooks 匯入頁面
3. 選擇您要匯入的客戶
4. 點擊「匯入選取項目」將其新增到您的地址資料庫中
防止重複: 系統透過檢查 QuickBooks 客戶 ID 自動防止重複匯入。如果客戶已被匯入,將會被略過。
從地址管理器列印
您可以直接從地址管理器列印標籤:
1. 從清單中選擇一個地址
2. 點擊工具列中的「列印」按鈕
3. 地址將載入到首頁,準備列印
6. QuickBooks 匯入
概覽
QuickBooks 匯入功能允許您從 QuickBooks Online 帳戶無縫匯入客戶地址。這消除了手動輸入資料的需要並確保準確性。
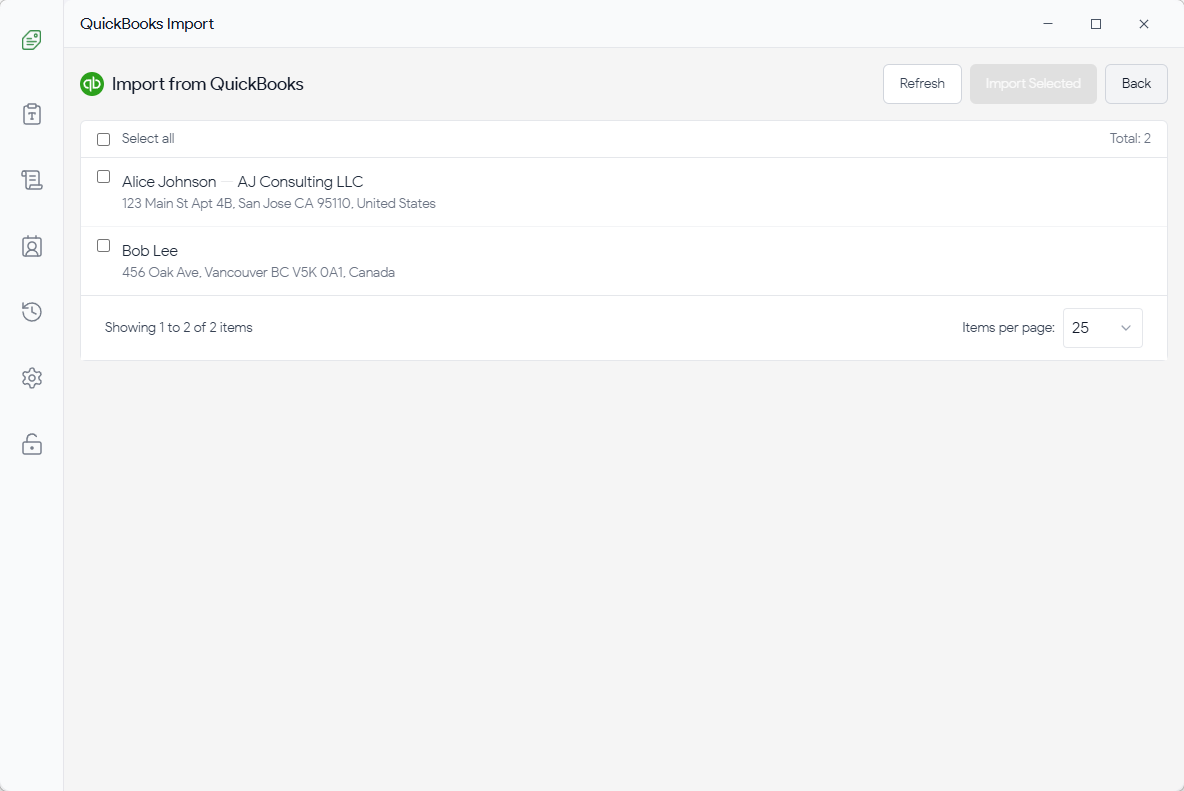
圖 3:QuickBooks 匯入介面
連接到 QuickBooks
1. 前往設定頁面
2. 點擊「連接到 QuickBooks」按鈕
3. 瀏覽器視窗將開啟,要求您登入 Intuit 帳戶
4. 授權 Addrly 存取您的 QuickBooks 資料
5. 連接後,您將在設定中看到「已連接」狀態
匯入客戶
1. 導覽至地址管理器
2. 點擊「QuickBooks」按鈕
3. 匯入對話框將顯示您的 QuickBooks 客戶清單
4. 使用搜尋方塊按姓名篩選客戶
5. 選擇您要匯入的客戶(或「全選」)
6. Click "Import Selected" to add the selected customers to your address database
7. After successful import, you'll be redirected back to the Address Manager
Duplicate Prevention
The import system uses QuickBooks customer IDs to prevent duplicate entries:
- Each QuickBooks customer has a unique ID
- When importing, the system checks if a customer with the same ID already exists
- If a duplicate is found, the existing address is returned instead of creating a new one
- This ensures you won't accidentally create multiple entries for the same customer
Note: If you need to update an imported address, you can edit it manually in the Address Manager. Re-importing the same customer will not overwrite your manual changes.
Refreshing Customer List
Click the "Refresh" button to reload the customer list from QuickBooks. This is useful if you've added new customers in QuickBooks since the last import.
Connection Status
If you're not connected to QuickBooks, the page will display a warning message with a button to navigate to the QuickBooks connection settings. Your connection status is automatically saved and will persist across application restarts.
批次列印
從地址管理器高效列印多個地址標籤。
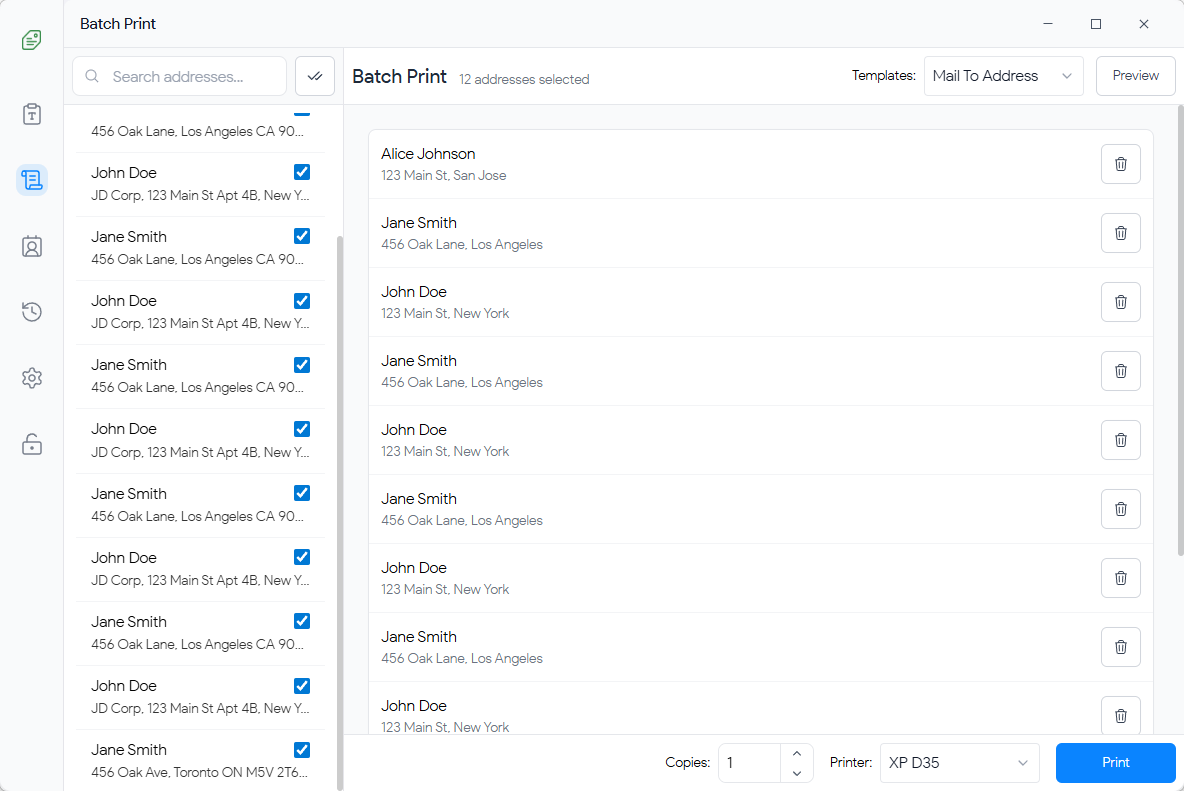
圖 4:批次列印介面
使用批次列印
選擇地址 在 地址管理器 中,將滑鼠懸停在地址上,然後點擊右側的 ✓ 複選標記圖示。要全選,請點擊頂部工具列中的 全選 按鈕(雙複選標記圖示)。
打開批次列印 選中項目後,點擊頂部工具列中出現的 批次列印 按鈕(帶有複選標記的印表機圖示)。
配置設置 在面板中,選擇目標 印表機 和您希望使用的 模板。設置所有項目的 默認份數,或在下方列表中調整單個份數。
預覽與列印 點擊 “預覽” 以驗證標籤的外觀。準備就緒後,點擊 “開始批次列印” 開始列印過程。

圖 5:批次列印預覽
批次列印選項
-
全選 / 取消全選: 快速切換批次列印列表中的所有項目
-
單獨份數: 根據需要為每個地址設置不同的份數
-
進度跟踪: 通過實時成功/失敗計數和狀態更新監控列印進度
7. Print History
Overview
The Print History page keeps a record of all your printing activities, including the address printed, printer used, and timestamp. This is useful for tracking and reprinting labels.
Viewing Print History
The print history is displayed in a list format, showing the most recent prints first. Each entry displays:
- Address information
- Printer name
- Date and time of printing
Searching Print History
Use the search box to find specific print records by address, printer name, or date.
Reprinting a Label
1. Select a print record from the list
2. Click the "Reprint Label" button in the details pane
3. You'll be redirected to the Home page with the address and settings pre-filled
4. Review and click "Print" to reprint the label
Deleting Print Records
You can delete individual print records or clear all history:
- Delete Single Record: Select a record and click the delete button, then confirm
- Delete All History: Click "Delete All History" button and confirm the action
Warning: Deleting print history cannot be undone. Make sure you want to delete before confirming.
8. Settings
Overview
The Settings page is divided into three tabs: General, Printer, and QuickBooks. Access Settings from the sidebar icon.
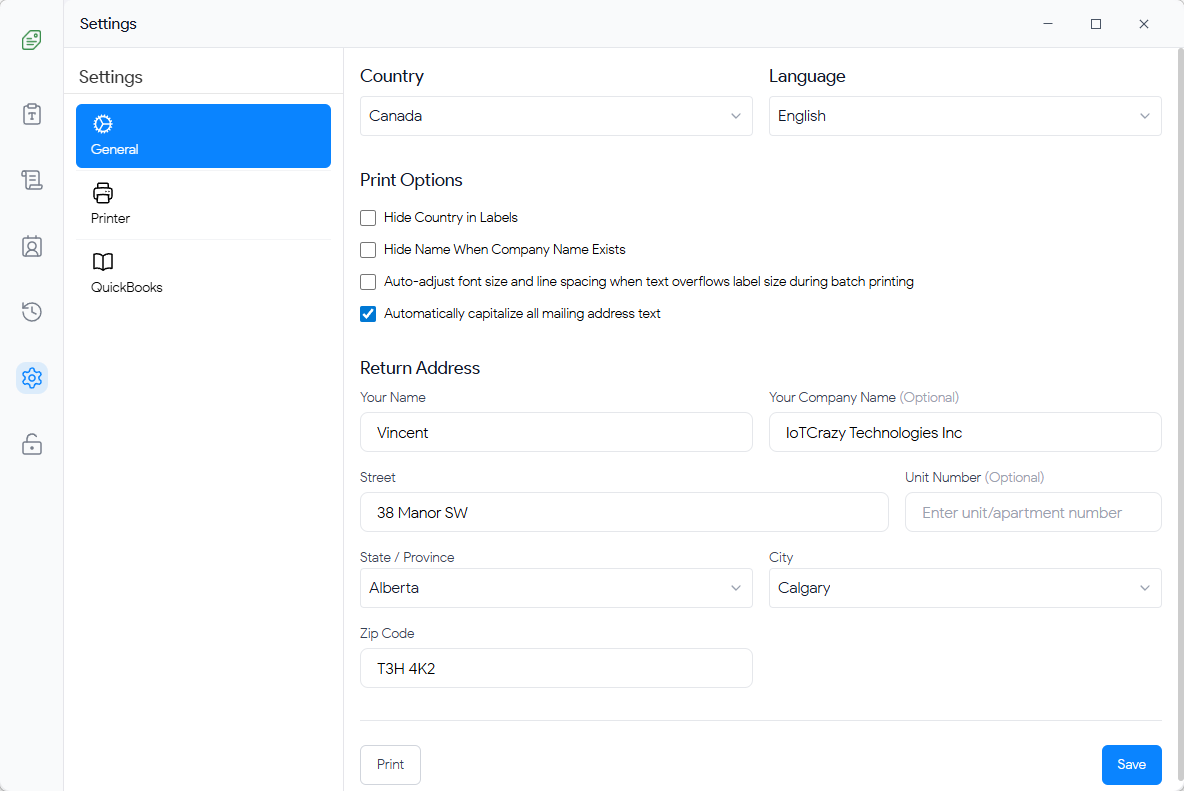
Figure 6: General Settings
7.1 General Settings
Language
Change the interface language from the dropdown. Supported languages include:
- English
- 简体中文 (Simplified Chinese)
- Español (Spanish)
- Français (French)
- Deutsch (German)
- Italiano (Italian)
- Português (Portuguese)
- Русский (Russian)
- 日本語 (Japanese)
- 한국어 (Korean)
- العربية (Arabic)
The language change takes effect immediately. Don't forget to click "Save" to persist your settings.
Default Sender Address
Configure your default return address that will be used when creating return address labels:
1. Fill in all address fields (Name, Street, City, State, Zip Code, Country)
2. Optionally add a Company Name and Unit Number
3. Click "Save" to store your sender address
You can also click "Print" to immediately create a label with your sender address.

Figure 7: Printer Management
7.2 Printer Management
Adding a Printer
1. Go to Settings → Printer tab
2. Click "Add Printer" button
3. Fill in the printer information:
- Nickname: A friendly name for this printer (e.g., "Office TSC Printer")
- Brand: Printer manufacturer (TSC, Zebra, Eltron, etc.)
- Model: Printer model number
- Resolution: Printer resolution (e.g., 203 DPI, 300 DPI)
-
Printing Protocol:
Select the protocol your printer uses:
- TSPL: For TSC thermal label printers
- ZPL: For Zebra label printers
- EPL: For Eltron label printers
- CPCL: For Cognitive label printers
- Windows Printing: For generic Windows-compatible printers
-
Connection Type:
How the printer is connected:
- USB: Direct USB connection
- COM Port: Serial port connection (select COM port and baud rate)
- WiFi/LAN: Network connection (enter IP address and port)
- Device Name: Select the actual device from the detected devices list
4. Click "Save" to add the printer
Testing a Printer
After adding a printer, you can test the connection:
1. Select the printer from the list
2. Click the "Test" button
3. A test label will be sent to verify the printer is working correctly
Editing a Printer
Click the edit icon next to a printer to modify its settings. Make your changes and click "Save".
Deleting a Printer
Click the delete icon next to a printer to remove it from your configuration. This action cannot be undone.
Refreshing Printer List
Click the "Refresh" button to scan for newly connected printers on your system.
7.3 QuickBooks Integration (Optional)
Addrly can optionally integrate with QuickBooks Online to import customer addresses. This integration uses OAuth 2.0 with PKCE for secure authentication.
Connecting to QuickBooks
1. Go to Settings → QuickBooks tab
2. (Optional) Configure an OAuth Proxy Server URL if you're using a server-based OAuth setup. Leave empty to use direct connection.
3. Click "Connect to QuickBooks"
4. Complete the OAuth 2.0 authentication process in your browser. You'll be redirected to QuickBooks to authorize the application.
5. Once authorized, you'll be redirected back to Addrly and the connection will be established
6. Your connection status will be saved and automatically restored when you restart the application
Importing Customers
After connecting to QuickBooks, you can import customer addresses:
1. Go to Address Manager
2. Click the "QuickBooks" button in the toolbar
3. Select the customers you want to import and click "Import Selected"
OAuth Proxy Server (Advanced)
If you're using a server-based OAuth setup, you can configure a proxy server URL:
1.
In the QuickBooks settings, enter your OAuth proxy server URL (e.g.,
https://yourdomain.com)
2. Click "Set" to save the server URL
3. The OAuth flow will now be proxied through your server
Privacy Note: QuickBooks integration is completely optional. You can disable network features entirely if you prefer to keep all data local. All QuickBooks tokens and data are stored locally on your computer. The connection status persists across application restarts.
Disconnecting from QuickBooks
To disconnect your QuickBooks account:
1. Go to Settings → QuickBooks tab
2. Click "Disconnect"
3. Confirm the disconnection. This will remove all QuickBooks authentication tokens from your local storage.
9. Printing
Print Process
When you click the "Print" button, Addrly:
- Renders the label design to a high-resolution bitmap
- Converts the bitmap to the appropriate printer command format (TSPL, ZPL, etc.)
- Sends the commands to the selected printer via USB, COM port, or network
- Records the print job in your print history
Print Quality Settings
The "Print Depth" setting affects print quality:
- Low: Faster printing, lighter print
- Medium: Balanced speed and quality (recommended)
- High: Slower printing, darker and more durable print
Print Troubleshooting
Printer Not Responding
- Check that the printer is powered on and connected
- Verify the connection type matches your setup (USB, COM, or Network)
- Try refreshing the printer list in Settings
- Test the printer connection using the "Test" button in Settings
Print Quality Issues
- Adjust the "Print Depth" setting (try Medium or High)
- Check that the label size matches your physical label dimensions
- Verify the printer resolution setting matches your printer's actual resolution
- Clean the printer head if prints appear faded or streaky
Text Not Fitting on Label
- Reduce the font size
- Adjust letter spacing and line height
- Use a larger label template
- Remove unnecessary text or formatting
Label Alignment Issues
- Adjust the "Left Margin" and "Top Margin" settings
- Check that the label is properly loaded in the printer
- Calibrate your printer if it has a calibration function
10. Troubleshooting
Application Issues
Application Won't Start
- Check that your system meets the minimum requirements
- Try restarting your computer
- Reinstall the application if the problem persists
- Check for error messages in system logs
Address Parsing Not Working
- Ensure the address follows a standard format (Name, Street, City, State, Zip)
- Try manually editing the parsed fields if automatic parsing fails
- Check that all address components are on separate lines
Preview Not Updating
- Try clicking in the address editor to refresh the preview
- Check that you haven't exceeded the label size limits
- Restart the application if the preview remains frozen
Settings Not Saving
- Make sure you click the "Save" button after making changes
- Check that you have write permissions in the application data directory
- Try restarting the application and re-entering your settings
Data Issues
Addresses Disappearing
- Check the search filter - you may have a search query active
- Verify that addresses weren't accidentally deleted
- Check the application data directory for database files
Print History Not Showing
- Ensure you've actually printed at least one label
- Check that print history wasn't cleared
- Try refreshing the page or restarting the application
Frequently Asked Questions
General Questions
Q Is Addrly free?
A Addrly 提供 15 天完整功能免費試用。試用期結束後,請訪問官方網站了解許可選項。
Q Does the application require an internet connection?
A No, Addrly works completely offline. All data is stored locally on your computer. Internet is only required for the optional QuickBooks integration.
Q Is my data secure?
A Yes, all your data is stored locally on your computer. No address information or personal data is ever uploaded to the internet. The application uses Rust's memory safety features and local database encryption.
Q Can I use Addrly on multiple computers?
A Yes, you can install Addrly on multiple computers. However, address data and settings are stored locally on each computer and are not automatically synchronized.
Printing Questions
Q Which printer brands are supported?
A Addrly supports TSC, Zebra, Eltron, Cognitive, and other brands that use TSPL, ZPL, EPL, or CPCL protocols. It also supports generic Windows-compatible printers.
Q How do I know which printing protocol to use?
A Check your printer's documentation or manufacturer website. Common protocols:
- TSC→ TSPL
- Zebra→ ZPL
- Eltron→ EPL
- Cognitive→ CPCL
If unsure, try TSPL first as it's the most common for thermal label printers.
Q Can I print multiple copies of the same label?
A Yes, use the "Print Count" setting on the Home page to specify how many copies you want to print.
Technical Questions
Q Where is my data stored?
A All data is stored locally in the application data directory:
%APPDATA%\Addrly\
~/Library/Application Support/Addrly/
~/.config/Addrly/
Q Can I customize the label templates?
A Yes, you can create custom label sizes by selecting "Custom" from the template dropdown and entering your desired width and height in millimeters.
Support & Resources
Getting Help
If you encounter issues not covered in this manual, here are some resources to help you:
Documentation
Check the official documentation website for detailed guides and tutorials.
Community Forum
Visit the community forum to connect with other users and share experiences.
Technical Support
Contact technical support via email for personalized assistance.
GitHub Repository
Check the GitHub repository for known issues, updates, and source code.
Version Information
Thank you for using Addrly!
We hope this manual helps you make the most of the application. If you have suggestions for improving this documentation, please let us know.
Need more help with Addrly?
Our support team is here to help you succeed with professional address label printing.